Showing posts with label Gift Ideas. Show all posts

Monday, March 15, 2010

Monogrammed Note Cards

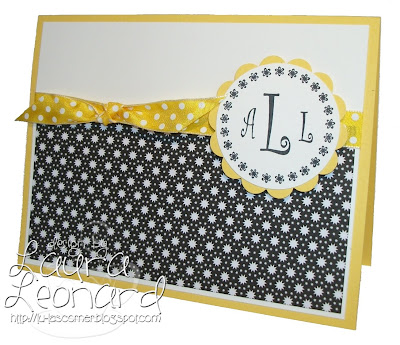
Good Afternoon! If you haven't already noticed; I love Taylored Expressions...LOL!!! Not only am I a loyal customer, but I'm also a Key Ingredients Subscriber. If you are not familiar with Taylor's Key Ingredients Subscription, you can read all about it HERE. With that being said, I'm just now getting around to posting what I made with February's Key Ingredients. I thought I better post this now before my March Ingredients arrive this week and I start creating with those.

February's Key Ingredients featured the classic black and white color combo and Taylor's challenge for the month was to add a crisp pop of color into our black and white cards. I decided to create a set of 8 (2 of each color) monogrammed cards for the most important woman in my life; my Mom. Since I was mass producing, I decided to keep the layout very simple. I pulled out my JustRight Curlz Kit and stamped the monograms with Memento Tuxedo Black in. I punched them out and then layered them to a scalloped circle. I also decorated a Perfect Package Card Box to put the cards and envelopes in. I kept that pretty simple as well, so that my Mom can reuse it once the cards are gone.




Thanks so much for stopping by and I hope everyone has a wonderful day!

Friday, April 17, 2009

Happily Ever After

Good Morning and TGIF!!! I'm your host today over on the Fun-Frilled blog. This week's theme is BRIDAL SHOWER. Here is a little peek of my take on this week's theme, but you'll have to head on over to the Fun-Frilled blog to see it in its entirety.

Don't forget to check out THIS post for details on how you can win a prize package worth almost $300 just by participating in our weekly themes over on the Fun-Frilled blog.

Thanks for stopping by and I hope everyone has a WONDERFUL weekend!

Wednesday, April 15, 2009

SUINKWWC36 - Easter Greetings Basket

Good Evening! I hope everyone is having a good week so far. It's Wednesday, which means it's time for another WHACHADOIN' WEDNESDAY CHALLENGE at Storage Units, Ink & More. This week's challenge is to make a basket. There are so many fun templates and tutorials out there. You can either create a May Day basket or share an Easter basket that you made for this year. Other ideas are to make a Mother's Day basket, flower basket, or shower favor basket. The possibilities are endless. So, do you want to play along? So, do you want to play along? If so, check out THIS post for more information. If you upload your creation to SCS, remember to use keyword SUINKWWC36.

For this week's challenge, I am showing you an Easter basket that I made. I used a super cute (and easy) template by Waltzingmouse on SCS. You can check out her template HERE. I printed the template on a sheet of double sided SU! Raspberry Tart Designer Paper. I adhered four strips of Rose Red cardstock on each side of the basket that I punched with my Martha Stewart Doily Lace Edger Punch. The handle is from the same designer paper and the flowers and brads are from Taylored Expressions.

The Easter Greetings sentiment is from the YOU'RE SOME BUNNY SPECIAL set from Storage Units, Ink & More. I stamped the sentiment is Rose Red and the scalloped circle is Kiwi Kiss.

Thanks so much for stopping by and don't forget to check out more baskets on the SUINK Blog.

Saturday, February 14, 2009

Happy Valentine's Day!

Good Evening and HAPPY VALENTINE'S DAY! I hope everyone is having a great weekend so far. I thought today would be perfect day to post one last Valentine's project. This is the other Target mailbox that I altered. I filled them with a bunch of goodies and my hubby and I gave them to our girls this afternoon. We went a little overboard on stuff for them, so I put whatever didn't fit in the mailbox in a cute little V-Day bag. I pulled out both of my Valentine's sets from Storage Units, Ink & More; SWEET THINGS and WILL YOU BE MY VALENTINE. I stamped the image on Choice Snow White cardstock and colored it in with Copic Markers and the Happy Valentine's Day sentiment was stamped in Real Red ink. The cardstock is Bazzill Precious and the patterned paper is from the Target $1 Spot. To finish it off, I added some yummy ribbon from my stash.

Thanks for stopping by. I hope everyone has a great weekend!

Thursday, February 12, 2009

Fun-Frilled DT & School Valentine's

Good Morning and Happy Thursday! I can't believe how fast this week is flying by; YAY!!! I have a couple of things to share with you today. First, my friend Michelle has started a new website. It is called FUN-FRILLED and I'm one of the inaugural Design Team Members. Each week there will be a new theme and each day a different designer will post a card or project with their interpretation of that week's theme. There are seven of us on the design team; one for each day of the week. I have linked all of these talented ladies on my side bar, if you would like to head on over and check out their blogs. My day of the week is going to be Friday. So, each Friday I will have a card or project posted on the Fun-Frilled website to go along with that week's theme. Posts will start on Monday, February 16th.

I made these Valentine's for my oldest Daughter to give out to her friends at school tomorrow. I used two different cuppies from the SASI; Love is Sweet set. The cardstock and ribbon are from the Valentine Key Ingredients from Taylored Expressions. I colored the images in with Copic Markers and used a silver pen for the bow on the cupid cuppie and on the pencil of the other cuppie. I added StarDust Stickles to the images and a Red Candy Dot to each of the cuppie's cherries. The three red hearts are also from the Love is Sweet set and I stamped them using Real Red ink. The size of the Valentine's are 3 1/4 x 3 1/4.


The Valentine's just weren't complete without a little candy...LOL! So, I used my craft knife to cut a couple of slits in the cardstock and added a Jolly Ranger heart shaped sucker to each of them.

Thanks for stopping by and I hope you all have a GREAT day!

Tuesday, February 3, 2009

My Timeless Templates - All Boxed Up

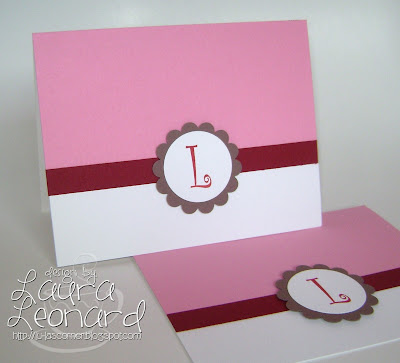
Good Morning and Happy Tuesday! I have a My Timeless Templates project to share with you today. A while back, I purchased the All Boxed Up template from PAPERTREYink. Then, I saw THIS post of Lauren's and couldn't WAIT to try out her One Sheet Wonder. Her One Sheet Wonder allows you to make four different cards; two of each design. I knew exactly what piece of patterned paper I wanted to use too. The patterned paper is called Ava-Aqua Floral and is from the Making Memories Noteworthy Collection. Isn't it pretty? And, it matches the Blush Red Dark & Baby Pink Medium Prism cardstock perfectly. The dark red satin ribbon is from Taylored Expressions and the Pretty in Pink Taffeta Ribbon is from Stampin' UP!. I used the "L" from my JustRite Curlz Kit and stamped it in Close to Cocoa and Ruby Red ink. Now for the pics:


This is the outside of the box
The Baby Pink Medium cardstock is embossed with the Cuttlebug Swiss Dots Embossing Folder


Card #1
The Blush Red Dark cardstock is embossed with the Cuttlebug Swiss Dots Embossing Folder


Card #2


Card #3


Card #4
I added a little bit of Close to Cocoa cardstock


This is the inside of the box
There are also eight matching envelopes in the set. I stamped all of the envelope flaps with an "L" using Ruby Red ink.


Thanks for stopping and I hope you all have a WONDERFUL day!

Thursday, January 29, 2009

Altered Valentine Mailbox

Good Morning! I was FINALLY able to get my hands on a couple of these tin mailboxes from the Target $1 Spot (YAY!!!). I tried the last two years, but every time I went there they were sold out. I only picked up two; one for each of my Daughters. I plan on giving each of them one for Valentine's Day filled with candy and a gift card to their favorite store. This was my first time altering one these mailboxes and I have to say, thanks to Emily's Tutorial, it was super simple. I used the cupid cuppie and the happy heart day sentiment from the SASI set, Love is Sweet, and colored them in with Copic Markers. I did, however, use a silver pen to color in the bow. The cardstock, patterned paper, and ribbon are all from the Valentine Key Ingredients from Taylored Expressions. I can't wait to alter the second one this weekend.


Today is the second day of SNEAK PEEKS for the two new releases by Storage Units, Ink & More. They are called GOIN' TO THE CHAPEL and BLARNEY STONE and they will be available starting February 1st. Make sure to stop by the following design team members blogs to see the sneak peeks they have in store for you today. You will not want to miss their ADORABLE (and I mean adorable) creations.

Tori - Wild Sprinkles
Carolina - Carolina's Creative Pad
Alex - Fairy Blossoms

Thanks so much for stopping by and I hope everyone has a WONDERFUL day!

Wednesday, January 14, 2009

SUINKWWC23 - Valentine Treat Holder

Good Morning! It's time again for another Whachadoin' Wednesday Challenge over at Storage Units, Ink & More. This week's challenge is to make a Valentine Treat Holder. You can check out THIS post for more information on how to play along. Please use the keyword SUINKWWC23 when uploaded to Splitcoast Stampers.

For this week's challenge, I decided to make my VERY FIRST Coaster Gift Box. I've been wanting to attempt one of these for while now and this challenge gave me the perfect opportunity to do so. I used medium weight coasters for my box which I purchased from Eclectic Paperie. The patterned paper I used to cover the coasters is called Hand-Dipped and it's from the BasicGrey Bittersweet Collection. I used Pretty in Pink and Purely Pomegranate cardstock and ribbon to match. The heart shaped chocolate box image is from the SWEET THINGS set. I colored it in with Copic Markers, added Crystal Stickles to the ribbon and bow, and used my white gel on the chocolates. Of course I had to fill the box with chocolates (LOL), so I used some Hershey Nuggets that I had on hand. I stamped white address labels with the swirl looking heart from the WILL YOU BE MY VALENTINE set and I used both Pretty in Pink and Purely Pomegranate ink to match the cardstock and ribbon. The "Happy Valentine's Day" sentiment is also from the WILL YOU BE MY VALENTINE set. To finish the box off, I added some white tissue paper that was left over from Christmas...LOL! So, why not join us this week and make your own Valentine Treat Holder and don't forget to check out more Valentine Treat Holders on the SUINK Blog. Thanks for stopping by and I hope everyone has a wonderful Wednesday.

Tuesday, December 23, 2008

JustRite Monogram Set

Good Morning & Happy Tuesday! Right before my husband and I were ready to ship out my in-laws Christmas gifts to Georgia, I decided I wanted to put one last little gift in there for my mother-in-law. So, I sat down this past Saturday morning (literally an hour before my husband was leaving for the UPS store) and made this set of six monogram cards. I wanted them to be cute (of course), but they had to be quick. So, I pulled out my SU! Friends and Flowers scrappin' kit and went to work. I used the JustRite Curlz Kit to create the monogram and stamped it in Tempting Turquoise ink. I punched out the monogram and then layered it to So Saffron cardstock which I cut out using my Martha Stewart Circle Cutter. I inked around the So Saffron layer with Chocolate Chip ink and popped it up on dimensionals. I also stamped six matching envelopes and packaged everything up in a Clearly Creative Card Box from PAPERTREYink. Then, I decorated the outside of the box with a belly band and more cardstock stickers from the Friends and Flowers scrappin' kit. I didn't have enough time to take a picture of the box, but it turned out really cute. I really hope my mother-in-law likes them. If you stopped by today, thank you, and I hope everyone is having a GREAT week so far.

Wednesday, December 17, 2008

Many Thanks Set

One of the "To Do" items on my list this week was to make a set of six thank you cards as a Christmas gift for one of my Daughter's teachers. With so much that still needs to be done for Christmas, I wanted (I NEEDED) the cards to be very quick and easy. Recently, I purchased Taylor's newest Taylored Kit and really liked the simple layout she used for the cards, so I decided to use the same layout. I found this patterned paper in my stash and thought is was just PERFECT. The paper is called "A Is For Apple" and it's from the Scribble Scrabble Autumn Afternoon Collection. I used Bazzill Old Flame and Bazzill Hillary cardstock to match and stamped the sentiment on SU! Naturals Ivory cardstock in Bravo Burgundy ink. The stamp is from the SU! Lots of Thoughts set. I got the idea to use just the "Many Thanks" part from hudsonhannah on SCS and you can view her cards that inspired me here. I used Bravo Burgundy ink to stamp the sentiment and the polka dot ribbon is from Taylored Expressions. I also stamped matching envelopes using the Teacher's Apple set from PAPERTREYink. The apple is stamped in Bravo Burgundy, the stem in Close to Cocoa, and the leaf in Old Olive. I actually made three different cards with different ribbon (two of each), but I'm just showing you one of them here. I packaged the cards and envelopes in a Clearly Creative Card Box from PAPERTREYink and tied the same ribbon around the box. Thanks for stopping by. I hope everyone is having a GREAT day!!!

Wednesday, November 26, 2008

Junior Legal Pad Wish Lists

YAY; it's WEDNESDAY! I wouldn't normally be this excited about a Wednesday, but since it's the last day of the work week and Thanksgiving is tomorrow; I am...LOL!!! After I finished making the card I posted yesterday, I decided to keep out my Be Merry patterned paper and die cuts to make my girls each a little "wish list". SCS has a great tutorial for these, which you can view it here. I bought a pack of junior legal pads at my local office supply store, had them cut them in half (vertically), and I was on my "merry" way...LOL!!! I used Regal Rose and Garden Green cardstock. The green wish list is stamped with the PAPERTREYink Polka Dot Basics set. So, why didn't I stamp the other one? Well, my five year old was looking over my shoulder the entire time I was making hers saying "Are you done yet Mommy, are you done yet?". Since I was pretty sure that her wish list wouldn't stay in one piece very long, I decided to forgo stamping the background and just finish it up as quickly as I could for her...LOL. It's hard to see in the photo, but I added Crystal Stickles to parts of the die cuts (you can click on the photo for a larger view) and the glimmer ribbon is from the Christmas Key Ingredients from Taylored Expressions. My girls were SO excited when I gave them each their wish lists; they couldn't wait to start using them. So, before they did, I snapped a picture of them. Thanks for stopping by and I hope you all have a wonderful day!

Friday, November 21, 2008

YAY; I'm a Friday Friend!

Good Morning and TGIF!!! Guess what? I'm this week's "Friday Friend" over on the SASI (Stamp a Sweet Impression) Blog. I can't even tell you how excited I was when I received Taylor's email earlier this week. Sure, I contained myself (a little bit) when I responded to her, but really I almost jumped out of my computer chair...LOL!!! I have always been a huge fan of Taylor's work (and now a huge SASI fan), so it's an honor to be their "friend" today...:)

To see what I created, head on over to the SASI Blog. You can get to know a little bit more about me and I even have a recipe to share with all of you. And, don't forget to stop over at Taylored Expressions to check out all of the "yummy" SASI stamps.

Thanks for stopping by today to share in my excitement. I hope you all have a wonderful weekend!

Friday, November 14, 2008

Sweet Holiday Wishes

Good Morning and TGIF!!! I'm so excited to show you what I made the other night. I was at Wal-Mart the other day on my lunch break and I came across Martha Stewart's Frosty Gingerbread paper pad. One of the patterns in the paper pad is this red, green, and pink candy paper. As soon as I saw it I knew I wanted to do something with the peppermint and spearmint Star Brites mints. I used a Clearly Creative Card Box from PAPERTREYink to hold the mints. The image and sentiment is from the Stamp a Sweet Impression set, Season's Sweetings and I colored the image in with Prismacolor and Copic Markers. I used my Sakura Quickie Glue Pen on the garland of the tree and added some Fire Engine Red Glitter from the Christmas Key Ingredients from Taylored Expressions. The star, ornaments, tree base, and cupcake liner are covered with Crystal Stickles (you can click on the the individual pictures for a better view of all the glitter) and I added some red rhinestones to the cupcake and sentiment. I used some red and green Bazzill cardstock that I had in my stash (don't know the exact names) along with some Regal Rose. The green cardstock was punched with my Fiskars Threading Water Punch and the red and white polka dot ribbon is also from Taylored Expressions. I was so happy with the way the mint box turned out, that I decided to make a matching card too. Thanks for stopping by today. I hope you all have a wonderful day and an even better weekend!

Tuesday, October 28, 2008

M&M's Treat Bags

Good Morning!!! My youngest Daughter goes to story time at the library every Monday morning, so I made 15 of these little treat bags for her to take with her this week. I was inspired by these treat bags of Taylor's. I used Bazzill Carrot Cake cardstock for the bag toppers and Bazzill Sweet Lacy, Bazzill Blackbird, and Bazzill Parakeet for the scallop punches (I made 5 of each color). The pumpkins were stamped in Palette Noir ink and colored in with Prismacolor Pencils. The bats and Trick-or-Treat sentiment were also stamped in Palette Noir ink and I used my round corner punch for the bottom of the bag toppers. The bags are the small glassine bags from PAPERTREYink. That's it; super easy. It only took me about 45 minutes to make all 15 bags and my Daughter loved them. Thanks for stopping by and I hope everyone has a great Tuesday!!!